So you are trying to build an API in Go and you need to add an authentication system. But you don’t want just any old authentication system.
You want something:
- Easy to implement.
- That doesn’t require a lot of infrastructure.
- That scales well.
- That could work with other languages.
Let’s talk JWT!
JSON Web Tokens (usually pronounced JOT) are a published standard for implementing claims between two parties. In plain terms sharing trusted data. This is ideal for authentication i.e. who is this, then setting what they are allowed to do through minimal authorization settings.
The best part is that creating and using JWTs in Go is incredibly easy and requires almost no infrastructure!
This article will walk you from absolute zero JWT knowledge to a fully distributed, three-party, JWT-based platform. While no prior knowledge of JWT is required, a basic understanding of Go, HTTP, and gRPC will help. But even that is not strictly required.
For the impatient: all the code I will show you is available on GitHub at https://github.com/carsonoid/talk-lets-auth-with-go
Additionally, If you have Go and go-present installed, you can view a fully interactive slideshow by following the instructions in the repository to open the slides in your browser.
Getting started: What is a JWT?
A JWT is just a three-part string. Seriously that’s it! A very generalized example would look something like this:
HEADER.PAYLOAD.SIGNATURE
HEADERis a base64 encoded JSON object.PAYLOADcan be anything but is almost always a base64 encoded JSON object.SIGNATUREcan change depending on the signing method used and may be omitted entirely.
If that seems like a lot to manage, don’t worry! We won’t have to deal with anything but the PAYLOAD directly. The other two fields will be handled automatically by our upstream JWT library.
An example raw HEADER might look something like this:
{
  "alg": "EdDSA",
  "typ": "JWT"
}
You can see that this is just a JSON object. It is common for the keys to be three characters, and there are common standardized keys. But it’s also valid but not precisely common to use custom keys in the header.
Looking at this, you can see that the header alone has nothing usable for doing authentication. It has no username or any other identifying information. However, it does tell us what kind of signature the token was signed with (this will be important later) and the type of token provided.
If we take that header data and base64 encode it, we get something like this:
eyJhbGciOiJFZERTQSIsInR5cCI6IkpXVCJ9
Remember: That is the same data, just condensed down.
An Example raw PAYLOAD might look something like this:
{
    "aud": "api",
    "exp": 1642982336,
    "iat": 1642982276,
    "iss": "http://localhost:8081",
    "nbf": 1642982276,
    "roles": [
        "admin",
        "basic"
    ],
    "user": "admin"
}
Now we are getting somewhere! While this does have some more standardized three-character keys, there is also much more complex data.
There are some common fields like aud(audience), exp (expire), iat (issued at), and nbf (not before). But here, you can see the beneficial part of our JWT, our custom fields. Or what the JWT world calls private claims. This is where we can add custom functionality on top of JWTs in our auth system.
We will only focus on user and roles claims for the rest of this article and in all our code. But you can put anything else you want in this payload. Although it is worth noting that you should not put secrets in the payload because JWTs are not encrypted. It would be best if you were wary of creating overly large payloads because we will store and pass them for each request. So over large payloads could cause excessive memory and network use.
Recall that a payload is a JSON object. For JWT use, we would need to encode it. If we were to then base64 encode the sample payload above, and we would get something like this:
eyJhdWQiOiJhcGkiLCJleHAiOjE2NDI5ODIzMzYsImlhdCI6MTY0Mjk4MjI3NiwiaXNzIjoiaHR0cDovL2xvY2FsaG9zdDo4MDgxIiwibmJmIjoxNjQyOTgyMjc2LCJyb2xlcyI6WyJhZG1pbiIsImJhc2ljIl0sInVzZXIiOiJhZG1pbiJ9
Again, the same data just condensed down. But remember, this is not encrypted, just encoded. Also, this encoding is not something we will ever have to write in our code because our upstream library will handle it.
So now we have auth, right? Can I take this data with the user and roles and pass it between services? Well, not quite. While we have an identity and some very minimal permissions data, we need a way to validate that data to ensure it is not modified by our users to try and get more access.
Signing
Token Signing is probably the most challenging part for a JWT authentication system to understand. But I have good news: a sound JWT library will handle all the complex details of signing for you! When it comes to Signing, we are trying to accomplish two things:
- Provide a way to know that a token comes from a trusted issuer.
- Provide a way to know that a token has not been modified since it was issued.
Remember, the token payload is just base64 encoded data. Without protection, a malicious user could decode, modify and re-encode the payload to add more permissions. Signing prevents that. We also don’t want to accept JWTs from just anyone. We want to accept them only from those we trust, and Signing allows that.
I won’t dig into how Signing works here, but essentially we need to take our payload and combine it with a bit of private data. In our case, this will be an ED25519 private key. But you could also use RSA or DSA private keys. Or even use just a simple shared key.
The key choices break down between two categories:
- Symmetric Signing — both parties can issue and validate using a shared secret.
- Asymmetric singing — for our cases, this is always done with public key cryptography. Because of this, only the party with the private key can issue tokens. But any service with a public key can verify them. That makes it ideal for distributed auth, where we only want one party to be able to create tokens.
Enough theory already! How do we sign it?
We pick a method then feed our payload + the signing data into our JWT library. Pseudo code would look something like this:
privateKey = readED(~/my-ed.pem)
signature = getSignature(HEADER, PAYLOAD, privateKey)
print(signature)
Notice that since we are using asymmetric Signing, we use the private key of a keypair for the issuing. After signature gen, you might get a signature that might look something like:
XEZW5O1wHDhmT-5Qm42uOoe728pDF4HX4c3OCZukYPqFBX2NlDyUdlOxUdT5i_ZhIzq-SoBfr6dhRvkk1mU-Dg
Notice that the signature has some new characters. This signature is an example of a signature’s appearance with ED25519 Signing. It is method-specific data and not just a base64 encoded JSON object. Again, you don’t need to understand the details, just that this gives us the final part of our JWT token!
The final Token
Now we have all three parts!
HEADER.PAYLOAD.SIGNATURE
When we put our data in we get something like this:
eyJhbGciOiJFZERTQSIsInR5cCI6IkpXVCJ9.eyJhdWQiOiJhcGkiLCJleHAiOjE2NDI5ODIzMzYsIml
hdCI6MTY0Mjk4MjI3NiwiaXNzIjoiaHR0cDovL2xvY2FsaG9zdDo4MDgxIiwibmJmIjoxNjQyOTgyMjc
2LCJyb2xlcyI6WyJhZG1pbiIsImJhc2ljIl0sInVzZXIiOiJhZG1pbiJ9.XEZW5O1wHDhmT-5Qm42uOo
e728pDF4HX4c3OCZukYPqFBX2NlDyUdlOxUdT5i_ZhIzq-SoBfr6dhRvkk1mU-Dg
Remember, JWT tokens are just long strings! But the three characters clearly indicate that this string is a JWT.
Token Validation
Okay, we have issued a token by creating a header, payload, and signature. Now we need a way to validatethe token in a second party. Sample pseudo code looks like this:
// read public key
publicKey = readED(~/my-ed.pem.pub)

// parse token to a struct
token, err = parse(TOKEN_STRING)

// check signature of token
err = token.Verify(publicKey)

// check validity of token
// using claims like nbf and exp
err = token.Validate()
The public key of our keypair comes in is in the third statement. We use the public key to test the signature of a token to ensure it came from a trusted issuer and that it has not been modified. If any part of the payload were changed, the verification would fail.
But what about that last line: token.Validate()? We ensured the token was not modified and came from a trusted source. What is left to “validate”? The answer lies in some of the standard registered claims we had put in our payload — things like nbf (not before) and exp (expire at). The Validate function checks these known fields (among other things) to ensure that the current time is not too early or too late for this token to be valid.
Now we talk about one of the most significant drawbacks of JWT auth: **There is no official or standard way to invalidate JWT tokens.**That means that tokens cannot be revoked or made unusable other than having the current time pass their exp time. While there are unofficial ways to deal with invalidating tokens, it is not common to use them, and it won’t be covered here.
It’s worth noting that while this is a big drawback, it’s worth the trade-off of not having to call back to a centralized service to validate tokens and handle auth for your platform.
But that’s it. That’s all the JWT theory I have for you. Now you have enough basic JWT knowledge to understand the wealth of Go code coming up below.
Let’s auth with Go!
First, let’s talk about what we will be building in Go. In order, we will be building:
- A simple command line token issuer.
- A simple command line token validator.
- An “auth-api” HTTP server that issues tokens.
- A “frontend” HTTP API server that uses the tokens for validation.
Along the way, we will build and add to a package called simplewjt. While we will use an existing JWT parsing library to do most of the hard work, there are still many choices we have to make, and it helps to hide these choices behind an opinionated interface.
simplejwt: let’s talk keys
For this package, we will choose to use asymmetric encryption. That means only the token issuer will need a secret, private key. All the token consumers will only need the public key. There are many key types to choose from, ones you might recognize, such as RSA and DSA do work. But since we are in Go, we also have native support for the ED25519 algorithm! This algorithm is more secure and has the added bonus that it doesn’t need variable sizes. Another huge benefit is that the keys are always relatively small.
Now, on to generating the keys. OpenSSL added ed25519 support in 2017 so any modern version should support it. For our examples, we are going to use the following commands:
openssl genpkey -algorithm ED25519 -outform pem -out auth.ed
openssl pkey -in auth.ed -pubout > auth.ed.pub
The first command generates the private key, and the second command generates the public key. Both in pem format, which we will need for our Go package. Example keys will look something like this:
-----BEGIN PRIVATE KEY-----
MC4CAQAwBQYDK2VwBCIEIBXw0/mjmff9EwFFLzmQkzZ/5WjEuWarVSKbhVQHqVx+
-----END PRIVATE KEY-----

-----BEGIN PUBLIC KEY-----
MCowBQYDK2VwAyEAz+4SdPDsmPa8mLePEVOCsBJ4rmr0d/GwwoUors+4zmg=
-----END PUBLIC KEY-----
Side Note: Those are so small! No more 40+ line RSA keys!
simplejwt: Choosing a JWT parsing package
Remember, our helper package is just to force our own JWT opinions. There is no reason to write a JWT parser from scratch. There are two primary options in the Go space right now:
- https://github.com/golang-jwt/jwt — This is a relatively simple package. It supports the bare minimum of required tooling for JWT issuing and validation.
- https://github.com/lestrrat-go/jwx — This is a much more robust and full-featured package. It sets out not just to support JWT tokens but to support more of the processes, protocols, and enhancements that come with the JWT ecosystem.
For this article, we will be using https://github.com/golang-jwt/jwt. This one covers the bare minimum of what we need without adding unneeded complexity. Also, I have the most personal experience with it. However, I think either is perfectly acceptable.
NOTE about lestrrat-go/jwx default jwt parser behavior: — Unlike golang-jwt, it does not do any JWT validation or signature verification by default when using its
Parsefunction. It is trivial to pass options to the function to enable it, but be aware that you must explicitly ask for both each time. That’s not a bug, just a design choice of the package to be aware of.
Code time!
From here on out, we will be writing a lot of code and only explaining the JWT-specific parts. For brevity, when you see things like import blocks, I will only be showing things outside of the Go standard library.
I also will be omitting things like file paths and other non-JWT specific details. For a complete end-to-end code reference, you are better off viewing the repo. I will include direct repo links throughout the examples as well.
simplejwt: Building a simple JWT issuer
A straightforward issuer package would look like this:
import (
    "github.com/golang-jwt/jwt"
)

// Issuer handles JWT issuing
type Issuer struct {
    key crypto.PrivateKey
}

// NewIssuer creates a new issuer by parsing the given path as a ed25519 private key
func NewIssuer(privateKeyPath string) (*Issuer, error) {
    keyBytes, err := ioutil.ReadFile(privateKeyPath)
    if err != nil {
        panic(fmt.Errorf("unable to read private key file: %w", err))
    }

    key, err := jwt.ParseEdPrivateKeyFromPEM(keyBytes)
    if err != nil {
        return nil, fmt.Errorf("unable to parse as ed private key: %w", err)
    }

    return &Issuer{
        key: key,
    }, nil
}
Here you can see that we are making our first choice. We always and only expect the path to a private ed25519 key to be passed to jwt.ParseEdPrivateKeyFromPEM . This Issuer struct then has everything it needs internally to issue new keys. We will discuss the functionality of this struct as we go.
The issue function
// IssueToken issues a new token for the given user with the given roles
func (i *Issuer) IssueToken(user string, roles []string) (string, error) {
    now := time.Now()
    token := jwt.NewWithClaims(&jwt.SigningMethodEd25519{}, jwt.MapClaims{
        // standardized claims
        "aud": "api",
        "nbf": now.Unix(),
        "iat": now.Unix(),
        "exp": now.Add(time.Minute).Unix(),
        "iss": "http://localhost:8081",

        // user is custom claim for the validated user
        "user": user,

        // roles is a list of roles attached to the user
        // it shows that claims can have more complex value types
        "roles": roles,
    })

// Sign and get the complete encoded token as a string using the secret
    tokenString, err := token.SignedString(i.key)
    if err != nil {
        return "", fmt.Errorf("unable to sign token: %w", err)
    }

    return tokenString, nil
}
This function again codifies opinions. We have explicitly decided to add the common fields of aud, nbf, iat, exp, and kid. These fields will automatically be used later to validate that our token was issued for our system as the expected audience (we will cover why we use aud later). It also uses the other time fields to ensure the token is properly time-boxed. There are many other common claims, like kid which would allow us to implement key rotation, but those are out of scope for this article.
Another opinion is that our tokens are only valid for one minute. This is an extremely short period and is just for demonstration purposes. A more standard expiration time would be 30–60 minutes. As always, it’s a balance between security, convenience, and the right answer for your system setup. But one minute is probably not right outside the bounds of this demonstration.
The last opinion is that we only support two custom claims: user and roles. That allows us to identify a specific user as owning the token. We can also use the roles to provide minimum authorization support in our system. While it’s not a great idea to build a complex authorization system using token data, it is common to do basic things like RBAC roles.
Remember, this is just an example. You can put any custom claims you want, and not all tokens have to have all claims. You can also put much more complex data in your claims if needed. But for our example, we are keeping it very simple and standardized.
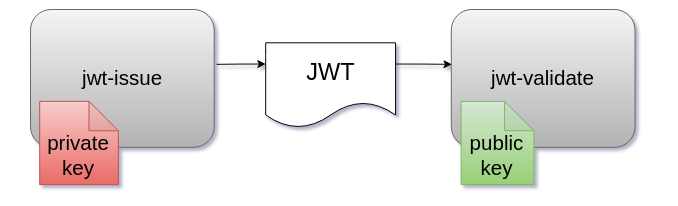
JWT Issuing: Creating cmd/jwt-issue
Now that we have a helper package, we can write a straightforward command line utility that is capable of:
- Getting a private key path from the command args.
- Reading the public key into an
Issuer. - Using
Issuer.IssueTokento create a new token for a hard-coded user and roles combo.
By writing a simple command line util. We can prove that our code works in its simplest form before we add more complex things like HTTP and gRPC.
package main

import (
    "fmt"
    "os"
    "github.com/carsonoid/talk-lets-auth-with-go/pkg/simplejwt"
)

func main() {
    issuer, err := simplejwt.NewIssuer(os.Args[1])
    if err != nil {
        fmt.Printf("unable to create issuer: %v\n", err)
        os.Exit(1)
    }

    token, err := issuer.IssueToken("admin", []string{"admin", "basic"})
    if err != nil {
        fmt.Printf("unable to issue token: %v\n", err)
        os.Exit(1)
    }

    fmt.Println(token)
}
That’s it! Since all the opinions are hidden in simplejwt this is all it takes! Now when we run it with the path to our generated private key file:
go run ./cmd/jwt-issue auth.ed
The result is a new JWT!
eyJhbGciOiJFZERTQSIsInR5cCI6IkpXVCJ9.eyJhdWQiOiJhcGkiLCJleHAiOjE2NDY1MjI3MDYsImlhdCI6MTY0NjUyMjY0NiwiaXNzIjoiaHR0cDovL2xvY2FsaG9zdDo4MDgxIiwibmJmIjoxNjQ2NTIyNjQ2LCJyb2xlcyI6WyJhZG1pbiIsImJhc2ljIl0sInVzZXIiOiJhZG1pbiJ9.egvzg3mTuTMPe_DLmTqx5ukclbd6_IIGD4_0qj6Qk_-QygeWfIH_3ojBhV67H2q4IGAuSrDKEhxeAFFxBPxWBQ
Notice the two dots? We could even base64 decode the header and payload to see what got generated:
{
    "alg": "EdDSA",
    "typ": "JWT"
}

{
    "aud": "api",
    "exp": 1646522706,
    "iat": 1646522646,
    "iss": "http://localhost:8081",
    "nbf": 1646522646,
    "roles": [
        "admin",
        "basic"
    ],
    "user": "admin"
}
JWT Validation: Building a validator in simplejwt
import (
   "github.com/golang-jwt/jwt"
)

// Validator does parsing and validation of JWT token
type Validator struct {
    key crypto.PublicKey
}

// NewValidator returns a new validator by parsing the given file path as a ed25519 public key
func NewValidator(publicKeyPath string) (*Validator, error) {
    keyBytes, err := ioutil.ReadFile(publicKeyPath)
    if err != nil {
        return nil, fmt.Errorf("unable to read public key file: %w", err)
    }

    key, err := jwt.ParseEdPublicKeyFromPEM(keyBytes)
    if err != nil {
        return nil, fmt.Errorf("unable to parse as ed private key: %w", err)
    }

   return &Validator{
        key: key,
    }, nil
}
This is a very simple code, almost identical to the Issuer other than the fact that it’s using the publickey.
The GetToken function:
// GetToken attempts to get a token from the given string
// it validates both the signature and claim and returns nil and an err if invalid
func (v *Validator) GetToken(tokenString string) (*jwt.Token, error) {
    // jwt.Parse also does signature verify and claim validation
    token, err := jwt.Parse(
        tokenString,
        // the func below is to help figure
        // out if the token came from a key we trust
        // our implementation assumes a single
        // trusted private key
        //
        // NOTE: this is where you would handle
        // key rotation or multiple trusted issuers
        func(token *jwt.Token) (interface{}, error) {
            // Check to see if the token uses
            // the expected signing method
            if _, ok := token.Method.(*jwt.SigningMethodEd25519); !ok {
                return nil, fmt.Errorf("Unexpected signing method: %v", token.Header["alg"])
            }

            // return the single public key we trust
            return v.key, nil
        })
        if err != nil {
        return nil, fmt.Errorf("unable to parse token string: %w", err)
    }

    // now manually validate the audience from the claims
    aud, ok := token.Claims.(jwt.MapClaims)["aud"]
    if !ok {
        return nil, fmt.Errorf("token had no audience claim")
    }

    // check for our expected audience from our issuer
    if aud != "api" {
        return nil, fmt.Errorf("token had the wrong audience claim")
    }

    return token, nil
}
This is the magic! Now we take in a provided JWT string and finally use it for auth! Since we are using go-jwt we know that the jwt.Parse function does two things:
- Checks that a trusted key signed the token and that the payload has not been modified. — The most off-putting part of this function we created is that it looks scary. But the only job of this func is to return the public key to validate the token. Since we only have one key, this is simple.
- Checks that the time fields in the token are what we expect. This is where we check for too old or too new tokens.
- Checks that the
audmatches the one for this auth system. In our case, we just care that this token was for theapi. We won’t dig too deep into whataudis for here. But it’s the key field that allows you to prevent services from being able to masquerade as users. Basically, if you want to fully separate two code bases, you should issue separate tokens that use a differentaudfor each system. That one tokens for one system cannot ever be used for the other, even if both systems trust the issuer.
So if we get to the bottom of this function, we know we were given a valid token that has not expired and has not been manipulated! From here on out, we can trust that the user and roles claimed in the returned jwt.Token are accurate and make authorization choices based on them.
JWT Validating: Creating cmd/jwt-validate
package main

import (
    "fmt"
    "os"
    "github.com/carsonoid/talk-lets-auth-with-go/pkg/simplejwt"
)

func main() {
    v, err := simplejwt.NewValidator(os.Args[1])
    if err != nil {
        fmt.Printf("unable to create validator: %v\n", err)
        os.Exit(1)
    }

    token, err := v.GetToken(os.Args[2])
    if err != nil {
        fmt.Printf("unable to get validated token: %v\n", err)
        os.Exit(1)
    }

    fmt.Println(token.Claims)
}
Here is another simple command line utility, which uses the validator we built to parse and check the given token string argument.
So, taking the output token from above (and assuming it’s not been 60 seconds since issue) we can run and validate the token:
TOKEN_STRING=eyJhbGciOiJFZERTQSIsInR5cCI6IkpXVCJ9.eyJhdWQiOiJhcGkiLCJleHAiOjE2NDY1MjI3MDYsImlhdCI6MTY0NjUyMjY0NiwiaXNzIjoiaHR0cDovL2xvY2FsaG9zdDo4MDgxIiwibmJmIjoxNjQ2NTIyNjQ2LCJyb2xlcyI6WyJhZG1pbiIsImJhc2ljIl0sInVzZXIiOiJhZG1pbiJ9.egvzg3mTuTMPe_DLmTqx5ukclbd6_IIGD4_0qj6Qk_-QygeWfIH_3ojBhV67H2q4IGAuSrDKEhxeAFFxBPxWBQ

run ./cmd/jwt-validate auth.ed.pub $TOKEN_STRING
Sample results:
A good token:
map[aud:api exp:1.646523574e+09 iat:1.646523514e+09 iss:http://localhost:8081 nbf:1.646523514e+09 roles:[admin basic] user:admin]
An expired token:
unable to get validated token: unable to parse token string: Token is expired
A token with a user-modified payload:
unable to get validated token: unable to parse token string: ed25519: verification error
We’ve done it!
We have done a proper two-party identity exchange using JWT tokens in Go. The only thing left to do is add HTTP and gRPC into the mix, and we can support fully decentralized and distributed authentication.
Next time: Adding the Services!
In the next article of this 3 part series, we will add HTTP and gRPC services both as issuer and validators for our JWT tokens!
Companion Video
If you would prefer a video version of this talk you can find it on the Forge Utah YouTube channel